After battling with the problem of dressing and using the bathroom when I could no longer stand up long enough
to have my slacks pulled up and down, I discovered the incredible convenience of open back adaptive slacks. Yes,
they sound embarrassing, but how often do you jump up out of your chair in public? Unless you stand up, no one can
tell that you aren't wearing ordinary slacks!
The pros far outweigh the single con of not wearing underwear under them. Underwear is not recommended for
people in wheelchairs anyway—it adds seams that can cause pressure sores. Instead, put a hand towel on your
cushion (long side front to back) and sit on that. In addition to being comfortable, absorbent, easy to change and
wash each day, a towel can be pulled from behind your back to scoot you up in your chair.
The pros are:
Easy dressing. No hard tugging required.
Super easy transfers to the toilet and back again whether you are being lifted to transfer or using a sling and
lift. The open bottom means your slacks don't have to be tugged down and then up again. Just lift and sit! The
opening keeps the slacks well out of the line of fire and makes wiping easy.
They even make using a urinal
easy for women. Your caregiver just scoots you down in your chair enough that you can pee over the edge, puts the
urinal firmly in place against you, and you can go without the hassle of finding an accessible bathroom. When
finished and wiped, your caregiver can scoot you back up using the towel you are sitting on or use your wheelchair
tilt and recline to slide you back into place. I bought a female urinal to use on a trip but now use it when I am
away from home too long to wait, as well as at home too. It is a real time saver!
Two ways to convert your slacks for easy toileting.
The first method is incredibly simple and, depending on the fabric, may require nothing but a pair of scissors.
You need elastic waist slacks that can be pulled up over your hips while you are in bed. This is easy if you are
thin and can be done by turning side to side if you are large. Just cut the back seam open (or just cut it out)
from an inch or two below the waist band to an inch to an inch and a half before the crotch seam. With sweat pant
fabric, that is all you need to do! If simply opening the back doesn't keep the edges out of the line of fire,
cut a few inches straight out to the side seams on each side of the opening. Make the cuts at about hip level.
Don't cut more than halfway to the side seam or you may have a gap showing bare skin. If the fabric is
something that will unravel, use a sewing machine to zigzag stitch next to the cut edges to prevent unraveling. If
you make the hip level side cuts, a couple rows of stitching across the end of the cut will help keep it from
ripping out farther.
The second method is for slacks without elastic waist bands, or, if like me, your
waist line has expanded since you have been in a wheelchair (That's my excuse and I'm sticking to it!),
for elastic waist pants large enough to pull easily over your hips. It is more complicated
to adapt either of these types of slacks, but slacks that fit well are well worth the extra sewing for comfort and
looks! Anyone with basic sewing skills and a sewing machine can adapt these pants. My husband, who never learned to sew, learned enough to do my slacks!
One tip when shopping for slacks to adapt this second way: Waist size is not as important as hip and thigh. The
waist will be adjusted when you adapt them. That works perfectly for me since now I don't have to buy pants with
clown sized legs just to get them around my belly!
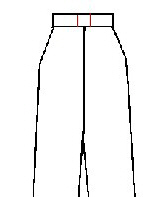
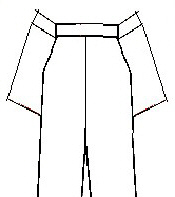
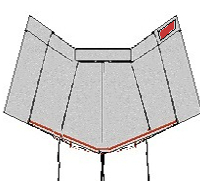
Back View
If the slacks you are adapting have an elastic waist band, the first step is to stitch the elastic inside to keep
it from retracting when you cut the waist band. Just stitch across the waist band about 1/2 " on each side of
the center back seam as indicated by the red stitching lines.
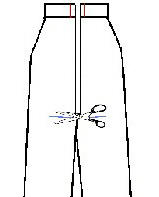
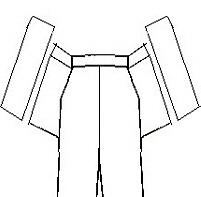
Back View
Cut down each side of the center back seam and across the bottom to remove it. Cut through the waist band and down
to 1" above the crotch seam.
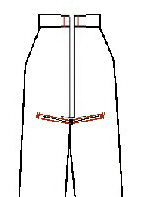
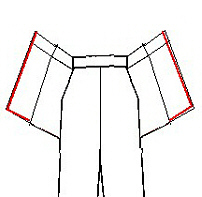
Back View
Cut across the pant legs on each side of the bottom edge of the cut out seam. These cuts should be only half-way
across the pant leg.
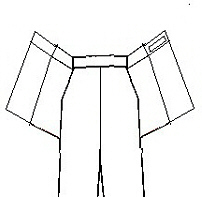
Back View
Open the slacks out and zigzag stitch along the edges of the cuts. (A good seamstress or tailor will want to add
facings or at least fold and stitch the raw edges. Doing so will put a thick seam directly under the bones you sit
on. It will be uncomfortable at best and may lead to pressure sores!)
Add two or three rows of stitching outside the point of the cuts to prevent tearing.
Front View
Turn the slacks over...
Front View
...and cut two pieces of fabric about four inches wide and as long as the back opening plus enough extra length to
fold over to create an extension to the waist band. A thin person may need the strip narrower. It is nice to find
fabric that is a close match to that of the pants, but not critical. These flaps won't be visible when you are
in your chair anyway.
Front View
With right sides together, stitch the flaps to the pants, the bottom edge even with the cuts across the pant
legs.
Front View
Fold the extra length down to the inside form the waist band extension and stitch. Zigzag stitch
or hem the raw edges. (You won't be sitting on these edges so hemming is ok.)
Front View
Stitch a strip of Velcro to the outside of the waist band on one flap.
Front View
Stitch a strip of Velcro to the inside of the waist band on the other flap.